

The ever-increasing cyber threat landscape is constantly on the offensive, incessantly looking for new victims to terrorize. Whether it is the Advanced Persistent Threats (APTs) with their big-budget and mass cyber-attack campaigns, or the small-time threat actors weaponizing their laptops, organizations must never make the mistake of disregarding these threats and employ the proper measures required to fend them off.
The dated reactive approach that organizations, unfortunately, continue to adhere to is proving to be impotent against these new threats. A newer, more proactive approach is needed, that’s where the need for a Cyber Threat Hunter arises. This article is intended for technical individuals looking to kick-start their careers in Cyber Threat Hunting.
What are Threat Hunting and Threat Intelligence?
Threat Hunting is the process of proactively hunting for threats by locating and eliminating any artifact, software, or malicious actor that poses a threat to a system under their jurisdiction.
A threat hunter has proactive and reactive duties, they combine the skills and knowledge of a threat actor with those of computer forensics and digital investigator.
A threat hunter must also possess research skills in order to update their arsenal against the newest threats and advanced persistent threat groups and conduct frequent threat intelligence activities.
A threat hunter is an invaluable asset to any organization with an IT infrastructure.
A threat hunter must reflect proper reporting abilities in order to clearly and effectively reflect their findings and assessments to the respective authority.
Threat intelligence is a subset of the Threat Hunting process. Threat intelligence is an activity of paramount importance, that if properly executed, will drastically facilitate the threat hunting activities, and will support any proactive effort for threat hunting and malware detection.
The threat intelligence process involves gathering indicators of compromise of previously observed threats and compiling these IOCs into a list that will be used as a reference in our scans to detect any similar artifact on the systems under investigation.
Threat intelligence efforts can be automated using a myriad of tools that will handle everything from gathering intelligence to integration into SIEM, SOAR, IDS, IPS, and Incident Response appliances.
In this article, the focus will be on the manual side of the threat intelligence process, where a hunt for specific malware on a system will lead to a targeted threat intelligence effort yielding various IOCs that will aid in the detection of similar artifacts. These IOCs range from simple file hashes and IP addresses to strings and memory values of an injected process.
The Threat Hunting Essentials
A threat hunter must have knowledge of the arsenal that will help them succeed in their mission. Fortunately, the tools required to conduct a thorough threat hunt are simple and effective. The following mentioned tools are an example of the many other variants that you can freely find online.
To better explain their features, the description provided for each tool is quoted from their respective websites.
FireEye Redline
This tool is your main companion in your investigative missions.
Redline provides host investigative capabilities to users to find signs of malicious activity through memory and file analysis and the development of a threat assessment profile.
With Redline, you can:
- Thoroughly audit and collect all running processes and drivers from memory, file-system metadata, registry data, event logs, network information, services, tasks, and web history.
- Analyze and view imported audit data, including the ability to filter results around a given time frame using Redline’s Timeline functionality.
- Streamline memory analysis with a proven workflow for analyzing malware based on relative priority.
- Perform Indicators of Compromise (IOC) analysis. Supplied with a set of IOCs, the Redline Portable Agent is automatically configured to gather the data required to perform the IOC analysis and an IOC hit result review.
Now let's assume that you have a machine that requires an investigation, your first course of action will be to create a collection batch script that will be run on a removable USB that will be placed on the victim machine. Using Redline, create a collector.
Depending on the type of scan that you will need to execute, you have 3 types of collectors:
- Create a Standard Collector: this collector is a basic script that will run collect, depending on how you configure the script, the memory, disk, system, and network artifacts. Note that the more options you enable for collection, the more it will take to the script to execute.
- Create a Comprehensive Collector: this collector is similar to the standard collector but it has more options enabled for collection by default.
- Create an IOC Search Collector: now in order for this option to work, you need to provide an IOC file for this script. You can either manually create this script or input a pre-made IOC file.

Redline Main Menu
FireEye IOC Editor
The FireEye Indicators of Compromise (IOC) Editor is a free tool that provides an interface for managing data and manipulating the logical structures of IOCs. IOCs are XML documents that help incident responders capture diverse information about threats, including attributes of malicious files, characteristics of registry changes, and artifacts in memory. The IOC Editor includes:
- Manipulation of the logical structures that define the IOC
- Application of meta-information to IOCs, including detailed descriptions or arbitrary labels
- Conversion of IOCs into XPath filters
- Management of lists of “terms” used within IOCs
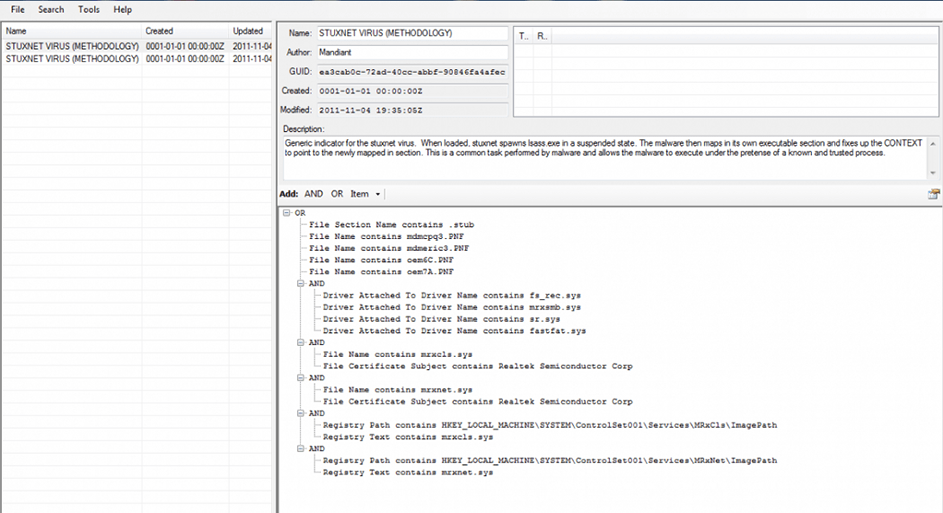
STUXNET list of IOCs in FireEye IOC Editor
After conducting online open-source threat intelligence activities targeting a specific threat, you will then have gathered a list of attributes and artifacts that uniquely identify this threat such as file hash, file size, file digital signature, unique strings, etc.
VirusTotal & Hybrid Analysis
Web sources such as hybrid-analysis and VirusTotal are a vital sources of threat intelligence and information that will immensely help you in identifying a threat and its attack vectors, malware dependencies, and command and control servers.
Combining them all together
Now, assuming that you have conducted a scan using one of the three previously mentioned collectors above, you will end up with a .mans file that you will open using the Redline analysis tool.
After opening this analysis session in Redline, the first thing that to check is the ports under processes. This will show you all the previously established connections to servers on the victim machine, if an IP or Port appears to be malicious after investigating it on VirusTotal, then you can focus your efforts on the process that established this connection.
Next, you need to check the timeline in order to see the chronological order in which the processes have been executed and their respective arguments. This listing will help you distinguish between the trusted windows processes and those that are malicious or whose memory is injected. You can use the “find evil — know normal” poster PDF from SANS DFIR. This PDF poster will help you enumerate the nature and attributes of trusted windows processes and their respective parent process.
You can also use the hierarchical listing in Redline which shows the hierarchical process listing of each process and its parent.
Redline also allows you to check if a process has any injected memory or rootkit.
After conducting a thorough analysis on Redline and perhaps discovering signs of a process memory injection (i.e., a trusted windows process is misbehaving), your next course of action should be the use of Volatility.
Volatility Memory Forensics
Volatility is an open-source memory forensics tool available on Windows, Mac OS X, and Linus. Volatility will help you scan for process injection on a memory file using malfind and its other arguments.
Next, you should conduct an investigation on the network communications level of the victim machine. But before you could do that, you should have captured the packets of the network communication on the victim machine using a tool like WireShark, and save the output as a .pcap file.
After that, you could investigate this .pcap file using NetworkMiner.
NetworkMiner
NetworkMiner is a tool that offers great help by parsing all the raw data into a categorized and clean representation that enumerates everything that was captured as a part of the network communication.
After getting a general overview of the communication on the victim machine, you could dive deeper into the contents of each packet by using WireShark.
Wireshark
Wireshark enables extensive investigation that could reveal information of a huge importance just by inspecting the contents of some packets.
Finally, you can check the logs in the event viewer and search for events that are relevant to the incident and investigation at hand. Investigating the event viewer logs of the victim machine will enable you to recapitulate over all the previously collected evidence, and form an event timeline, eliminating the scatter of the evidence and transforming it into a coherent sequence of events.
In conclusion, the increasing capabilities of threat actors are pushing organizations into adopting a new more proactive approach to satisfy their cybersecurity needs. The Cyber Threat Hunter is a key player in this endeavor, combining the cunning of a threat actor and the discipline of computer forensics investigators. This article covered the basic techniques and tools of the threat hunter, allowing you to start performing threat hunts and developing this skill.
References
- FireEye Redline: https://www.fireeye.com/services/freeware/redline.html
- FireEye IOC Editor: https://www.fireeye.com/services/freeware/ioc-editor.html
- VirusTotal: https://www.virustotal.com/
- Hybrid Analysis: https://www.hybrid-analysis.com/
- Find Evil — Know Normal SANS DFIR Poster: https://digital-forensics.sans.org/media/SANS_Poster_2018_Hunt_Evil_FINAL.pdf
- Volatility Memory Forensics: https://www.volatilityfoundation.org/
- WireShark: https://www.wireshark.org/
- NetworkMiner: https://www.netresec.com/?page=NetworkMiner